Monday, August 30, 2010

Time to build another kayak

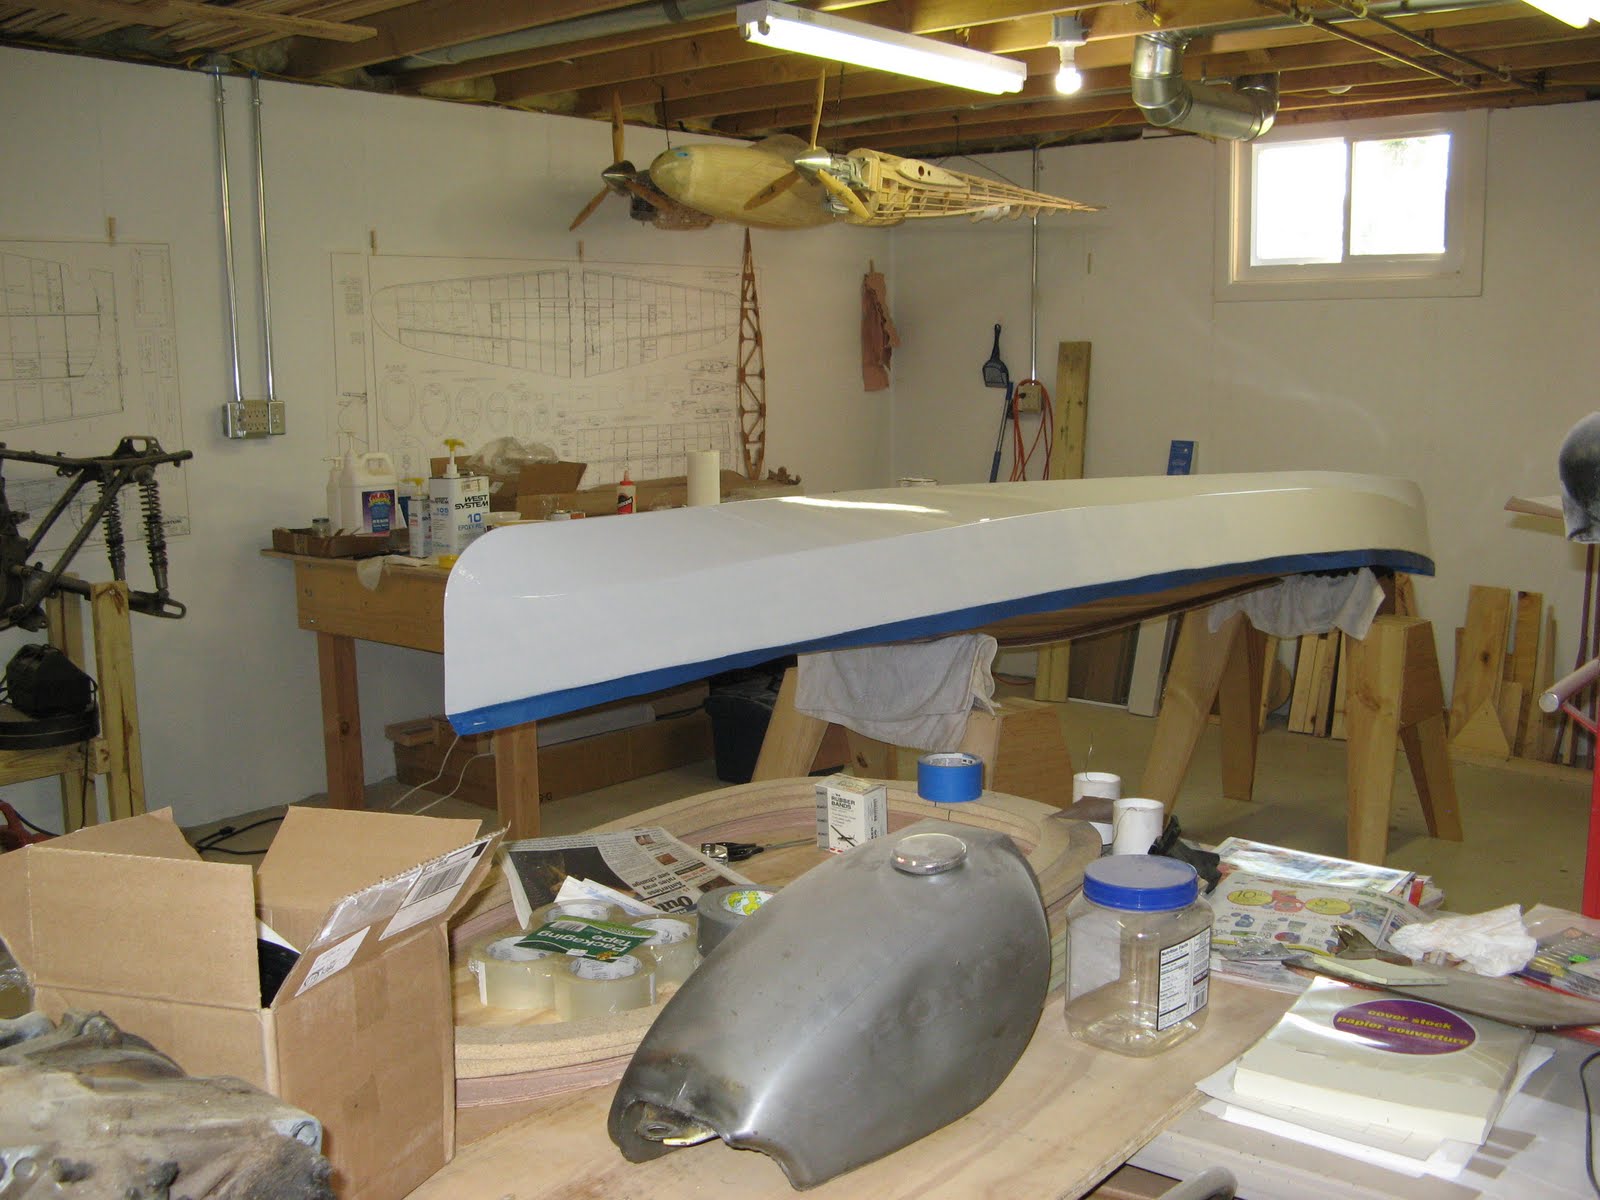
Well the Wood Duck is finished and we use it allot. It was my first kayak build and I learned allot about both building and kayaking.

I made some big blunders during the building process but that's all what learning is about.

It's time to use what I have learned to advance to the next level. A full cedar strip sea kayak.

I have started to build a Guillemot !

I started a new blog to document the build.

www.louskayakworks2.blogspot.com

Sunday, August 8, 2010

Greenland paddle


You have probably noticed my skinny looking paddle. I get a lot of comments about it at the lake. It's a greenland paddle. Just like the ones that the Inuits have used for hundreds of years.
Don't let those skinny blades fool you. I see a lot of big name people in the kayak world using Greenland paddles. I was stunned to see how much power you can generate with this paddle. And when you paddle against a strong wind, The blade up in the air does not catch the wind and slow you down like a wide paddle does.
People laugh when I tell them that I carved out this paddle from a 2x4 stud I bought at Home Depot for $2.05. It is too heavy if you plan to paddle for more than an hour or so. I need to carve a lighter one from Cedar.
Lou

Thursday, August 5, 2010

Clear coat paint job


I posted not long ago about my ugly clear coat paint job. The supermarine clear paint did not flatten out and left the deck covered with brush and roller marks. Well as it turns out, it does not look that bad in the sunlight.
Bring it indoors and it looks like crap.

I said in that post that I will sand it down and varnish the deck the old fashioned way. Well I found out that you can not varnish over this product. It has what they call long oils in the clear coat. Varnish will not stick to it.

I also found out why the clear coat did not flatten out like it was supposed to do. You must use a flattening thinner with this paint with a ratio of 10 to 15 %. Nowhere on the can does it give that information.

Now all I need is about one ounce of this thinner to redo the clear coat on the deck. I will have to buy a full quart plus pay over $20 for shipping and handling. I think I will wait until after the kayak season to sand the deck smooth and repaint again.

I have tried to show the clear coat in these photos.
Lou


Sunday, July 25, 2010

First time in the water


Today we put the wood duck in the pond for the first time. We have never kayaked before so we can not compare it to anything but we both liked it very much. Donna thought it might be too wide for her, she said that her feet were too far apart to feel comfortable. I am trying to figure out if I can get a big walleye in this thing without tipping over. The more we paddled the more comfortable we felt. It seems to move pretty fast and I was stunned at how well it penetrates the wind.
I give special thanks to my lovely wife Donna who put up with all the noise, sawdust, and paint fumes. Thanks to my buddy Ted for all his technical support. And thanks to my Dad who helped me with tools and cedar strips.
I want to build another kayak for Donna but I think she wants to chose a more narrow design than the wood duck. In the mean time I will start hocking things on e-bay to raise some money for another build.
Lou

Saturday, July 24, 2010

Bad paint job

Well I am finished messing around with this Supermarine paint for the deck. It is very expensive, the shipping and handling charge was just criminal, and it does not work like it is supposed to. I have sanded the deck smooth and repainted seven times. each time I have tried something different and each time it looks like crap.

Tomorrow Donna and I will take our ugly kayak to the lake for the first time and use it, ugly or not.

On Monday I will sand the deck smooth and start the long presses of varnishing. The old fashion way that has proven to work for many decades.

Lou

Friday, July 16, 2010

painting the deck

Well I have colored outside the box this time. The traditional method of finishing the wood is with marine grade varnish. It is a long hard process of putting on multiple coats of varnish and sanding between coats. Then after a year or two of use, you have to do it all over again to keep it looking good.

So my buddy Ted said that I should try a new clear paint that is supposed to be the new way to finish a wood boat. It's called Supermarine revolution 1000.

The first coat went on great and when it dried it looked perfect. Smooth as glass and a wet gloss shine. I needed to put on a second coat to get the UV protection needed for the epoxy and glass cloth underneath. The second coat did not turn out very good at all. Ted thinks that it might be the high humidity on the day that I painted. Maybe I should have painted in the basement with the AC running.

I will wait a few days for the clear coat to cure and sand it smooth again. Maybe I can get a day with low humidity to re-coat the clear again.

Lou


Friday, July 9, 2010

painting the hull bottom

Well it's been a few weeks sense my last post. I have been sand, filling, and sanding again almost every day.
I just painted the hull bottom about an hour ago.
I could have left the hull a natural wood grain finish but I had some ugly spots that I wanted to hide. The beautiful cedar deck will be done in clear to show the natural wood.
Another reason I painted the hull white is for safty on the lake. White sticks out like a sore thumb on the water. So if a boat runs me over, he can't say that he did not see me.
Tomorow I will sand the white with a 320 grit sand paper and then apply a second coat.
I just noticed that this photo showes some other projects that are going on in my man cave.

Tuesday, June 22, 2010

fill and sand

Fill and sand, then fill and sand again, and fill and sand some more.

Each time it looks better than the time before.

I am in too much of a hurry to get this kayak into the water. I have to force my self to take the time to do it the right way, and not just the fast way.

It is paying off to do a quality job because each day it looks nicer than the day before.

Sunday, June 20, 2010

sanding the deck

Today is Fathers day so before having
four generations of Farhoods over for dinner, I was able to start sanding the deck.
This was just a rough first sanding with 80 grit sandpaper.
Next I will fill in some open joints with epoxy thickened with wood flower. When it hardens I will sand it smooth again and repeat this until all the holes and cracks in the joints are full.
The purple heart wood looks very nice but it is very heavy and hard to work with.

Sunday, June 13, 2010

glueing the deck

Today I started to glue the deck to the hull. This is a huge milestone.

This is the toughest part of the build. If you follow the instruction book you will end in disaster. After seeing the trouble others have had on the kayak forum, I needed to find a better way to match the sides of the hull to the edge of the deck.

I came up with a procedure that works much better.

By mid week the hull and deck will be one structure.

Friday, June 11, 2010

glassing the deck

Here I am glassing the underside of the deck.

The cedar strip deck was very fragile when I removed it from the forms. Now that I have glassed the underside, it is very ridged.

After glassing the other side, the deck will be strong enough to sit on without damage.

Sunday, May 30, 2010

art work

I thought that I would try some art work to build some confidence for more complex work in the future.
This design is from the CLC catalog and was very easy to do. It looks much more complex then it is.

striping the cedar deck

I am making good progress striping the cedar deck.

It is not as hard to do as most people think. It is just slow going because you have to wait for the glue to dry between strips.

I spend 30 or 40 minutes cutting, fitting, and gluing strips. Then I have to wait about two hours before doing another row of cedar strip.

I think that more people would use cedar strips for the deck if they knew how easy it is. I think that it is much easyer then stitch and glue plywood.

Sunday, May 23, 2010

The strips are glued together with TightBond.

The northern white cedar bends very easy and is very soft. Very easy to work with and is very light. About one fourth the weight of the purple heart.

I made little clamp blocks and some wedges to hold the strips in place until the glue sets.

wood duck kayak

Well I have finally started to build the deck.

The king plank and the shear strips are the dark colored strips. They are made from purple heart.

The light colored strips are made from northern white cedar.


The purple heart is a hardwood that comes from South America. It is not the type of wood you would normally use on a kayak. I wanted a very dark color and could not find any very dark cedar. The purple heart is as hard as a rock and about as flexible as steel. Bending it around a curve was a pain in my ass and the dogs ass too. It is also way to heavy for a kayak. It will probably add two or three pounds to the total weight of the kayak.

If this kayak turns out looking good I might use purple heart again but if not, I will just chalk this up as a lesson learned.

Monday, May 10, 2010

wood duck kayak

Well I built a boat in my basement and had no way to get it out. So I cut a hole in the wall.

I did not get to work on the kayak at all this week. But I did get two big things out of the way.

I worked about five hours designing and building
the second router fixture I needed to put the bead and cove on the deck strips.

And the big job was the window. I spent about twelve hours of very hard work. Mostly digging and moving dirt and rocks. But now I have a way to get kayaks in and out of the basement.

Now with these things out of my way I can get moving on this kayak. It seems like I have spent most of my time making tools or fixtures or jigs and windows, and have not spent any time actually building the kayak itself.

Tomorrow I will work on milling the cove on my deck strips. By this time next week I would like to be well into the construction of the cedar strip deck.

Sunday, May 2, 2010

wood duck kayak

Today I installed the temporary forms that will form the cedar strip deck.
When the deck is finished, the forms will be removed. They are held in place with hot glue and should come out easy.

wood duck kayak

This is the router bit for milling the bead on the deck strips. It mills a bead with a 1/8 inch radius.

It also mills a 1/8 inch radius on the tip of your finger if you stick it where it does not belong. At first I did not think it would. But now I am a true believer.

wood duck kayak

This is one of two router fixtures I need to mill the bead and cove on all the deck strips.

This is the one for milling the bead. I still need to design and build the fixture for milling the cove.

Saturday, April 24, 2010

wood duck kayak

Now the hull is very stiff. It is now a composit laminate. Four milimeater Okoume plywood with glass cloth and epoxy on both sides. It is very strong but still very light weight. I need to give it 24 hours for the epoxy to cure before I move to the next step.

wood duck kayak

Fiber glassing the kayak hull. The glass cloth is draped over the hull and then the epoxy is spread over the cloth, bonding it to the wood hull.

wood duck kayak

Mixing a batch of epoxy. The epoxy comes in two parts. Resin and hardener. Once it is mixed together you have about 15 or 20 minuets to work with it before it starts to set up. It works faster if it is warm, slower if it is cool.

Wednesday, April 21, 2010

wood duck kayak

This evening after work I spent about an hour finishing the hull interior.

I put another coat of epoxy over the glass cloth to fill the weave. Then I brushed a coat of epoxy over all the bare wood on the interior to seal the wood and make it water tight.

Tomorrow is my 12 hour day at work so have to wait until the day after to start sanding the exterior of the hull.

Sunday, April 18, 2010

wood duck kayak

You can see the wet tape over the panel seams.

After two hours, I put fiberglass cloth over the now tacky tape.

This is the inside of the cockpit where you sit.

wood duck kayak

The new fillet's are about two hours old and are tacky to the touch. Time to cover them with fiberglass tape.

Once the fiberglass is soaked with epoxy it becomes clear. The wood grain will appeare natural.

Once the epoxy sets, It is very strong but still very light weight.

Saturday, April 17, 2010

wood duck kayak

Today I put fillets on all the hull panel joints. I used epoxy mixed with wood flower and filled all the joints with a 1/2 inch radius.

In about two hours the epoxy will be tacky enough that I can start laying glass tape over the joints.

Monday, April 12, 2010

wood duck kayak

Today I spent the day with my Dad. We went to Johnson's Workbench in Charlotte MI. I wanted to buy all my cedar for the kayak deck. I was able to get northern white cedar but they were all out of western red cedar. ( It's a 90 mile drive to Charlotte from home ).

I wanted to get all my cedar and rip all of it into deck strips all in one day. Now it will take another full day to do it all over again.

Oh well, I need to spend more time with Dad so this will be another day together.

In the photo I am riping a 1x6 into 1/4 inch strips. I got 17 strips out of each board. I cut up 4 boards, all on Dads table saw at his house. I fed the cedar into the saw and Dad pulled from the other side. It took about an hour to cut all four boards.

Sunday, April 11, 2010

wood duck kayak


I could build much faster but I have to wait for the epoxy glue to set up. It's like you work for an hour or two, then wait until tomorrow before working some more. I think I could build this thing in 4 or 5 days if I did not have to wait for the epoxy to set.
In this photo I have just glued all of the hull panel seams. ( WAIT UNTIL TOMORROW ) Then I will remove all of the stainless steel stitches and all of the temporary hull forms.

Friday, April 9, 2010

wood duck kayak

Finally, after all this time, I have something that looks like a kayak.

It took me about five hours to stitch the four hull panels together.

Tomorow I will start glueing the seems with epoxy. When the epoxy cures, I will remove all the stitches.

It's too late to turn back now !!! The kayak is to big to get out of my man cave. You can see the window in this photo. I will have to cut through the 10 inch thick concret wall and make a window large enough to get the kayak outside.

Wednesday, April 7, 2010

Now comes the fun part. After all the time spent making parts and jigs, it's time to start assembling parts into something that looks like a kayak.

The hull panels are held together with wire. Everyone seems to use copper wire for the stitching. I tried copper wire and the stitches kept braking. I was not even touching the kayak and I heard a ( POP ), another broken stitch !!!

So I tried some .041 SS safty wire !!! Much better.

The stitches are temporary. After the panels are tacked with glue, the stitches are removed.

wood duck kayak

04-07-2010

A lower hull panel clamped to the router jig.

I routered all four hull panels in less than an hour.

wood duck kayak

My good old block plane and carbide sanding block. Simple tools that make hard work easy.

If you look close at the edge of the hull panel you will see the bevel that goes the full 12 foot length of the kayak. It took only three or four minutes to make that bevel with the tools shown.

Sunday, April 4, 2010

wood duck kayak

04-04-2010

Here I have glued the scarf joints for the upper and lower hull panels for the left side of the kayak. I have clamped them to the router jigs for proper alignment. The epoxy glue needs 24 hours to cure. Then I will repete the prosses for the right side panels.

wood duck kayak

04-04-2010 Easter Sunday

I have spent my life as a tool maker and have never used a block plane until now. What a great tool. I used it and a carbide sanding block to make the tapers for my scarf joints.

The kayak is 12 feet long but the Okoume plywood is only 8 feet. That is why I need to scarf two pieces of plywood together. So that my hull panels will be long enough to make a 12 foot kayak.

Thursday, April 1, 2010

04/01/2010

This is a poor photo of the router jigs that I made for my kayak. They make the part layout on the Okoume plywood very easy. Then you rough cut the parts out with a saber saw. The parts are finished by placing them on the jigs and using a router.

You would not make jigs to make just one kayak. But it makes the job so much easier when you are planing to make multiple kayaks. This will also make all the parts uniform in shape. The left side panels will match the right side perfictly, eliminateing any chance of a twist in the shape of the hull.

Lou

Wednesday, March 31, 2010

wood duck kayak

3/31/2010

My name is Lou and I am building a kayak. My good friend Ted said that I should start a blog to document the build. I have never blogged before so this is all new to me.

I wanted to find a new Hobbie that I could afford and one that I could do with my wife Donna. Kayaking was something that we could both do together and it is very low cost. We can play in the great out doors and get lots of exercise. Once you pay for the kayak the rest is free. No fuel to burn, no insurance to buy, no license to pay for every year.

My plan is to build three kayaks this year. one each for Donna and myself, and a third one to put up for sale. If I can sell one and make a small profit, then I will start a fourth kayak. If I can't sell one then I will have a kayak to give to one of my loved ones. As long as I can sell one without loosing money then I will start another. I love to work with my hands and I have lots of spare time.

I bought a set of plans for a CLC wood duck 12 hybrid. I have made router jigs for all the plywood parts. This will make it very easy to make the plywood parts from full sheets of plywood.

I rough cut all the parts for one kayak in about four hours. Now I am waiting for my epoxy to get here so that I can Scarf joint the long panel's together. When that is done I can finish the parts on the router jigs.

I will see if I can post some photos in my next post.

Lou